Kubernetes
Streamlining Your Container Orchestration

Description
Kubernetes, often abbreviated as K8s, reigns supreme in the realm of container orchestration. But what exactly is it, and how does it function? Let’s delve into the explanation of container management using Kubernetes.
Containers 101
Imagine applications as self-contained packages, each with its libraries and dependencies, neatly bundled and ready to run anywhere. These packages are containers, lightweight and portable alternatives to traditional virtual machines.
The Orchestral Challenge
While containers offer numerous benefits, managing them at scale, especially in complex environments with multiple containers working together, can be a pretty tough task, but this is where Kubernetes steps in
The Core of K8s
- Clusters: Kubernetes groups containers into logical units called pods, which are the fundamental building blocks. Multiple pods, along with shared storage and networking resources, form a cluster, the core operational unit managed by Kubernetes.
- Nodes: Each cluster comprises machines (physical or virtual) called nodes, where the containerized applications run. Kubernetes schedules and manages the placement of pods across these nodes.
- Deployment and Management: Kubernetes empowers you to declaratively describe the desired state of your application in a configuration file. Based on this configuration, it automates deployments, scaling, and management of your containerized applications.

Kubernetes in Action:
- Deployment: Define the desired number of pods for your application and Kubernetes takes care of creating and deploying them across the cluster.
- Scaling: Need to handle increased traffic? Kubernetes can automatically scale your application by adding or removing pods as required.
- Self-healing: If a container crashes, Kubernetes automatically restarts it, ensuring your application remains highly available.
- Load balancing: Kubernetes manages how incoming traffic is distributed across your application's pods, ensuring efficient resource utilization.
Benefits:
- Simplified management: Handles complex deployments and simplifies application scaling.
- Portability: Runs on various infrastructure platforms, offering flexibility and freedom of choice.
- High availability: Ensures your applications remain operational even if individual containers or nodes fail.
- Scalability: Easily scales applications up or down to meet changing demands.
- Resource efficiency: Optimizes resource utilization by efficiently placing containers across nodes.
Beyond the Basics:
Kubernetes boasts a rich ecosystem of tools and extensions, empowering developers and operations teams to tailor the platform to their specific needs.
Who Should Consider K8s?
If you're building and deploying modern, cloud-native applications or aiming to leverage the benefits of containerization, Kubernetes is a powerful tool to consider. However, its adoption requires a certain level of technical expertise and understanding of containerized environments.
Why Kubernetes:
You've learned what Kubernetes is and how it works, but why should you consider using it for your containerized applications?
Efficiency and Automation:
- Streamlined deployments: Kubernetes automates deployments, scaling, and management tasks, freeing up valuable time and resources for development teams.
- Resource optimization: By efficiently placing containers across nodes and managing resource allocation, Kubernetes ensures optimal resource utilization, reducing costs.
- Reduced operational overhead: Automating routine tasks and self-healing capabilities significantly reduce the manual effort required to manage containerized applications.
Scalability and Resilience:
- Effortless scaling: Kubernetes seamlessly scales your applications up or down based on demand, allowing you to effortlessly handle traffic spikes and fluctuations.
- High availability: Through automatic container restarts on failure and intelligent load balancing, Kubernetes ensures your applications remain operational even in the event of node or container failures.
- Fault tolerance: The distributed nature of Kubernetes clusters minimizes the impact of individual node or container failures, enhancing application resilience.
Flexibility and Portability:
- Cloud-agnostic: Kubernetes operates on various infrastructure platforms, offering flexibility in your cloud or on-premises deployment choices.
- Vendor independence: Avoid vendor lock-in by leveraging the open-source nature and widespread adoption of Kubernetes.
- Hybrid and multi-cloud deployments: Kubernetes facilitates seamless deployments across on-premises, hybrid, and multi-cloud environments, enabling greater flexibility and agility.
Beyond the Technical Advantages:
- Active community and vibrant ecosystem: Benefit from a vast community of developers, extensive documentation, and a rich ecosystem of tools and extensions to support your Kubernetes journey.
- Faster time to market: Streamlined deployments and simplified management enable quicker delivery of new features and functionalities.
- Improved developer experience: Developers can focus on building applications rather than managing infrastructure, leading to increased productivity and innovation.
However, consider these points before diving in:
- Learning curve: Kubernetes requires a certain level of technical expertise to understand and manage effectively.
- Complexity: Managing large and complex Kubernetes deployments can be a bit complicated(especially if you’re a beginner at Tech).
- Security considerations: Securing your Kubernetes clusters requires careful planning and implementation of security best practices.
Overview of Kubernetes Architecture
Kubernetes operates on a master-worker architecture. The master node manages the cluster, and worker nodes host the applications. An image illustrates this setup, showcasing how the master node orchestrates tasks and communicates with worker nodes.
Deployment of Applications
Applications in Kubernetes are defined through YAML manifests. A sample YAML file is provided with explanations for key fields like `apiVersion`, `kind`, `metadata`, and `spec`. This demonstrates how to express the desired state of an application.

Pods and Containers
Pods are the smallest deployable units, hosting one or more containers. An image illustrates how containers within a pod share the same network namespace, making it easy for them to communicate with each other.

Replication Controllers and ReplicaSets
Here's the link to the ReplicaSet documentation.
Replication Controllers and ReplicaSets ensure scalability and availability by maintaining a specified number of pod replicas.
- A ReplicaSet's primary purpose is to maintain a specified number of identical pod replicas. If a pod fails or is deleted, the ReplicaSet ensures a replacement is created to maintain the desired replica count.
- ReplicaSets maintains the desired state of the system by continuously monitoring the actual state of pods and making adjustments as necessary. If the actual state deviates from the desired state, the ReplicaSet takes corrective actions.

Services and Networking
Services
A Kubernetes Service provides a stable virtual IP address and DNS name for a set of Pods, even as those pods may be created, destroyed, or moved across nodes. This allows stable communication between different parts of your application within the cluster.
Pod Networking
Every pod in Kubernetes gets its unique IP address. Pods within a node can communicate directly. Pods on different nodes require Kubernetes networking to reach each other.
→ Networking Models
- Kube-proxy: The traditional model reliant on network address translation (NAT). Can be less performant in large clusters.
- Container Networking Interface (CNI) plugins: More popular and flexible. Common choices include
- Calico: Focuses on network security and policy enforcement.
- Flannel: Simple and easy to set up.
- Cilium: Utilizes eBPF for high performance and observability.
ConfigMaps and Secrets
ConfigMaps is a fundamental Kubernetes resource designed to store key-value pairs of non-sensitive configuration data for your applications running within the cluster. This data can be accessed by Pods in various ways:
- Environment variables: Inject ConfigMap values as environment variables into your containerized applications.
- Command-line arguments: Pass ConfigMap values as command-line arguments when launching your containers.
- Volume mounts: Mount the entire ConfigMap as a volume within the container filesystem, allowing access to individual key-value pairs as files.
Important points to remember
- ConfigMaps are not designed for storing secrets like passwords or API keys. Use Secrets for sensitive data.
- ConfigMaps have a size limit of 1 MiB for the entire data store.
Here's the documentation for ConfigMaps.
Persistent Volumes and Persistent Volume Claims
While Kubernetes excels at container management and orchestration, it inherently treats container storage as ephemeral. This essentially means data created within a container is lost when the container stops running. However, for stateful applications requiring persistent data storage, Kubernetes provides two key resources: Persistent Volumes (PVs) and Persistent Volume Claims (PVCs).
Here's the documentation for Persistent Volume Claims (PVCs).

Monitoring and Logging
Kubernetes, while powerful, can become complex to manage as applications and resources scale. To maintain visibility into your cluster's health and performance, monitoring and logging are crucial practices.
Monitoring
Continuously collect and analyze data on various aspects of your cluster, including:
- Application health: Monitor application responsiveness, resource utilization, and error rates.
- Cluster resource usage: Track CPU, memory, and storage consumption by nodes and Pods.
- Infrastructure health: Monitor node status, network performance, and overall cluster stability.
Learn more about logging here.
The website below is a good source for discovering a diverse range of tools, both free and paid, for the monitoring of Kubernetes environments.
Website: middleware.io
Deployment Instructions
This guide will walk you through setting up a Kubernetes cluster using single master and worker nodes on Ubuntu. It's designed to be easily scalable by adding more worker nodes later.
Prerequisites
- Hardware: You'll need at least two Ubuntu nodes, one designated as the master and the other as a worker. The master requires a minimum of 2 CPU cores (vCPUs) and 2 GB of RAM, while the worker node can function with 1 vCPU and 2 GB of RAM (though additional resources are recommended for optimal performance).
- Networking: Ensure your nodes have static IP addresses within the 10.X.X.X/X network range. We'll be using a separate network range, 192.x.x.x, for pods managed by the Calico network plugin. Importantly, these two network ranges should not overlap to avoid conflicts.
Click here, to setup your Kubernetes.
Steps
Install the required software:
- Container runtime: Choose and install a container runtime like CRI-O or Docker on all nodes. Refer to the linked guide for specific installation commands.
- Kubeadm, Kubelet, and Kubectl: These are essential tools for managing the cluster. Install them on all nodes using your package manager.

Initialize the master node
- On the master node, run the following command (refer to the linked guide for detailed flag options):

- This command initializes the control plane on the master node, generating a join token crucial for worker nodes to join the cluster.
Join worker nodes to the cluster
- On each worker node, run the following command, replacing <master_ip> with the actual IP address of the master node and <join_token> with the token obtained from the previous step:

This command instructs the worker nodes to connect to the master node and become part of the cluster.
Install a network plugin
- Kubernetes needs a network plugin to manage pod networking. This guide suggests Calico. You can install it using the provided command in the linked guide:

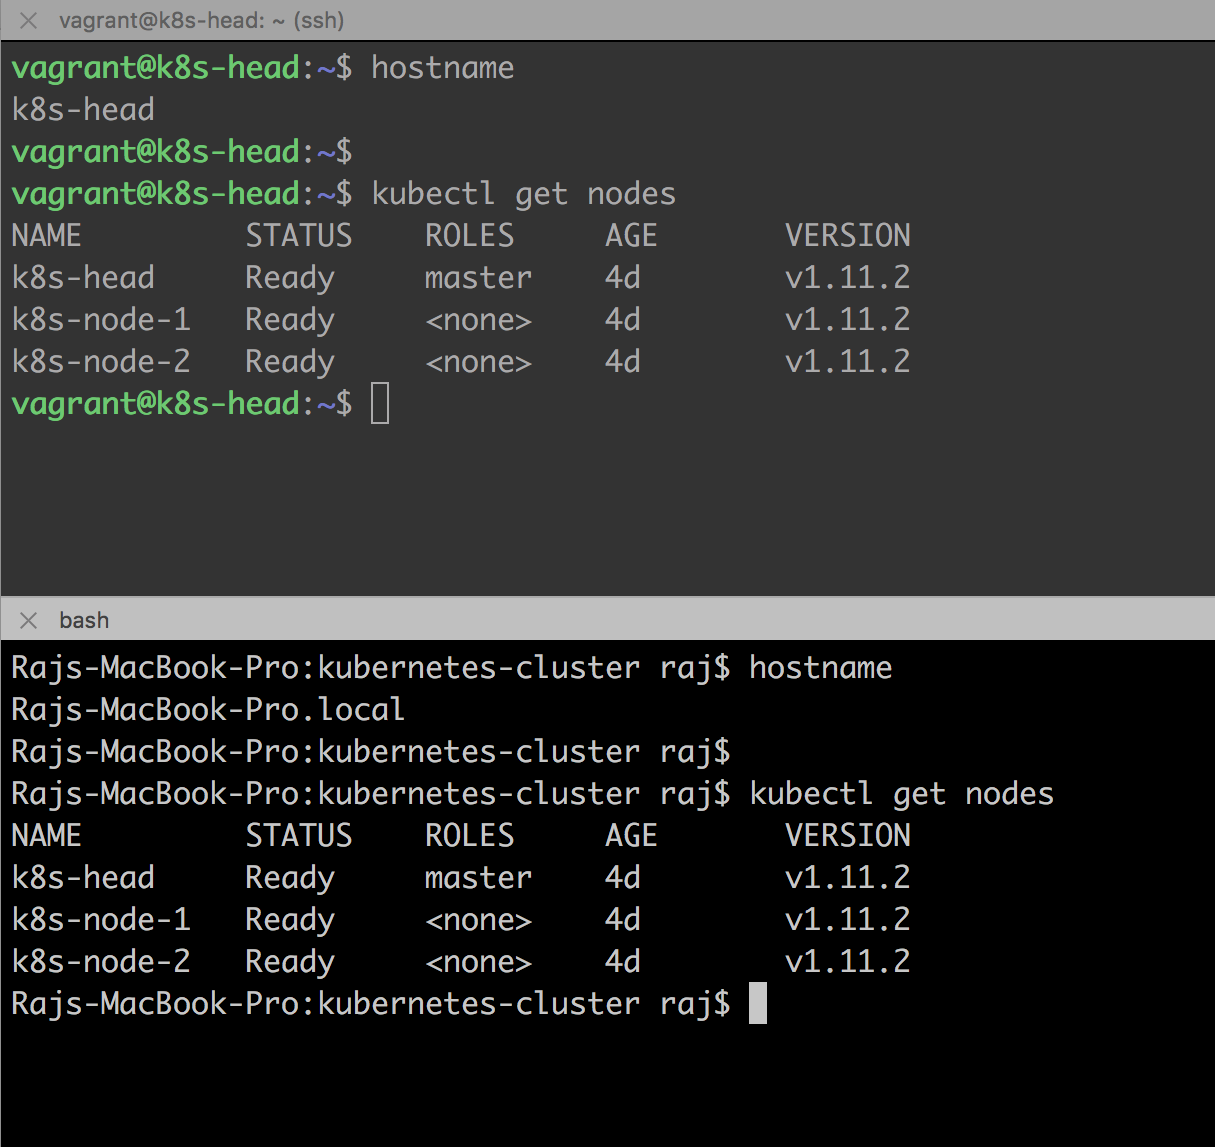
Verify the cluster
- To confirm a successful cluster setup, run:

- This should display all nodes (master and worker) listed as "Ready" in the "STATUS" column.
If you're further interested in really understanding the setting up of Kubernetes on bare metal using kubeadm, I'd highly recommend checking out some of these YouTube videos linked below. These videos not only walk you through each step in a way that's easy to follow, but they also throw in some helpful commentary and visuals that make the whole process much more effortless.